| Page Templates | Set Up |
| >
Pop-In >>Description >>Page Cartoon >>Step-by-step > Scriptbutton > Widgets |
> Path to Jmol > Jmol on your server > Testing locally (no server) |
The Pop-In Template
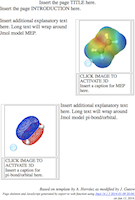
This tab is designed to produce a web
page that displays images of Jmol graphics, each of which can be
converted to a
live Jmol display by the user. This makes initial loading of the
page
faster. The image will match the initial Jmol setup for each
occurrence which
is chosen by
setting up the Jmol viewer the way you wish. You add the text
later in your
favorite web editor. This panel can be opened once and returned to
anytime.
An example picture of such a page is shown below:
1) Set the relative path to the Jmol applet on you web site from where you will put the folder (directory) containing the files created by this program. (more...)
2) Put your name(s) in the Author space. This will add you as the author in the page meta data that is used for searching.
3) Add the title you want to appear in the browser window title bar. This does not have to be the same as the title you will use for the page.
4) If not already done, open the first file you want to appear in your page using the File..Open.. menu in the Jmol viewer. If you will be using more than one model, open the models one at a time (occasionally you might need to use "load append" or the "append models" checkbox to allow displaying more than one model simultaneously), and follow steps (5) - (7) for each individual model.
5) Set the state of the model (zoom, rotate, select, change colors, add orbitals, set the molecule spinning, etc.) exactly the way you want it to appear on the web page.
6) Set the width and height for the model on this tab. There is no need to resize the application window itself.
7) Click on the "Add Present Jmol State as Instance" button and select a name for this applet instance.
8) Repeat for as many different displays as you wish. Because of the memory constraints of web browsers, it is probably best to limit yourself to no more than a few instances of Jmol on a single web page. The larger the applet size, the more of a problem this will be. However, you can certainly create a page with several applets and then split it later into multiple web pages.
9) When you are done, click on "Save HTML as..." Provide either the name of a new directory for this page or the name of the HTML file (.htm or .html) you want to create or replace. All necessary files will be created in the same directory. These include the HTML page itself, the JavaScript file JmolPopin.js, and three files for each view: a data file, a Jmol script, and a PNG image. If a new directory is indicated, the HTML file will be created in that directory and have the same name, with ".html" appended.
10) Open the HTML file in your favorite web editor and add your explanatory text and anything else you wish. As long as you do not alter the inside of the tables where Jmol will be displayed, you should be able to change the page without disrupting the JavaScript that controls the behavior of Jmol.